In this blog post, I’ll guide you through setting up Keepalived for high availability on a multi-node system. Keepalived uses the VRRP (Virtual Router Redundancy Protocol) to ensure a seamless failover between a primary and backup node, allowing you to manage a virtual IP address that switches automatically if the primary node becomes unavailable.
We’ll cover the following:
- Installing Keepalived on both the primary and backup nodes.
- Configuring Keepalived for automatic failover and failback.
- Verifying failover behavior.
Step 1: Install Keepalived on All Nodes
First, install Keepalived on both the primary and backup nodes using apt:
apt -y install keepalivedRepeat this on both nodes to ensure they are running the Keepalived service.
Step 2: Configure Keepalived on the Primary Node
On the primary node, you’ll configure Keepalived to act as the MASTER. Here’s the configuration you need to add to the /etc/keepalived/keepalived.conf file:
vrrp_instance VRRP1 {
    state MASTER
    interface ens192
    virtual_router_id 101
    priority 200
    advert_int 1
    virtual_ipaddress {
        10.34.104.101/24
    }
}
Breakdown:
- state MASTER: This node is the primary node that holds the virtual IP.
- interface ens192: Network interface you are using.
- virtual_router_id 101: Unique ID for this VRRP instance.
- priority 200: Higher priority ensures that this node is preferred as the master.
- virtual_ipaddress: The virtual IP address assigned for failover.
Once you’ve made these changes, restart the Keepalived service:
systemctl restart keepalivedVerify that the virtual IP is assigned to the interface:
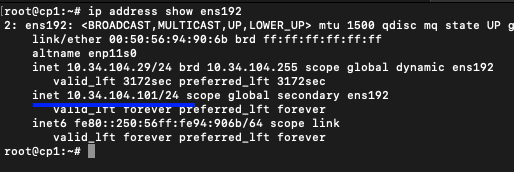
ip address show ens192
You should see the virtual IP 10.34.104.101 assigned to ens192.
Step 3: Configure Keepalived on the Backup Node
On the backup node, configure Keepalived to act as the BACKUP. Modify /etc/keepalived/keepalived.conf as follows:
vrrp_instance VRRP1 {
    state BACKUP
    interface ens192
    virtual_router_id 101
    priority 100
    advert_int 1
    virtual_ipaddress {
        10.34.104.101/24
    }
}
Breakdown:
- state BACKUP: This node takes over if the master becomes unavailable.
- priority 100: Lower priority ensures this node only takes over when the master is down.
Restart Keepalived on the backup node:
systemctl restart keepalivedStep 4: Verify Failover and Failback
Simulating Failover
To test the failover, bring down the primary node’s interface:
ip link set down ens192On the backup node, check the network interface:
ip address show ens192
You should see the virtual IP 10.34.104.101 assigned to the backup node’s ens192 interface, confirming the failover.
Simulating Failback
Now, bring the primary node’s interface back up:
ip link set up ens192On the primary node, verify that the virtual IP has been reassigned:
ip address show ens192The virtual IP should be back on the primary node, indicating that failback is working correctly.
