Helm provides a quick way of setting up a Redis cluster using a pre-made Helm chart.
1. Add the Helm repository containing the Kafka chart you wish to install.I will use for this tutorial bitnami repo.
helm repo add bitnami https://charts.bitnami.com/bitnami2. Update local Helm repositories.
helm repo update3. Use helm install to install the chart. The basic command is as follows:
helm install my-release bitnami/kafkaIn short time kafka chart will be deployed and you will see 2 pods (Kafka and zookeeper) up and running. You can check it with command
kubectl get podsYou should see status Running
You can also specify some additional flags like here, including specific version to install
helm install kafka bitnami/kafka \
               --set controller.replicaCount=3 \
               --set externalAccess.enabled=true \
               --set externalAccess.controller.service.type=NodePort \
               --set externalAccess.controller.service.nodePorts[0]=32501 \
               --set externalAccess.controller.service.nodePorts[1]=32502 \
               --set externalAccess.controller.service.nodePorts[2]=32503 \
               --set serviceAccount.create=true \
               --set rbac.create=true \
               --set listeners.client.protocol=PLAINTEXT \
               --set listeners.controller.protocol=PLAINTEXT \
               --set controller.automountServiceAccountToken=true \
               --set broker.automountServiceAccountToken=true \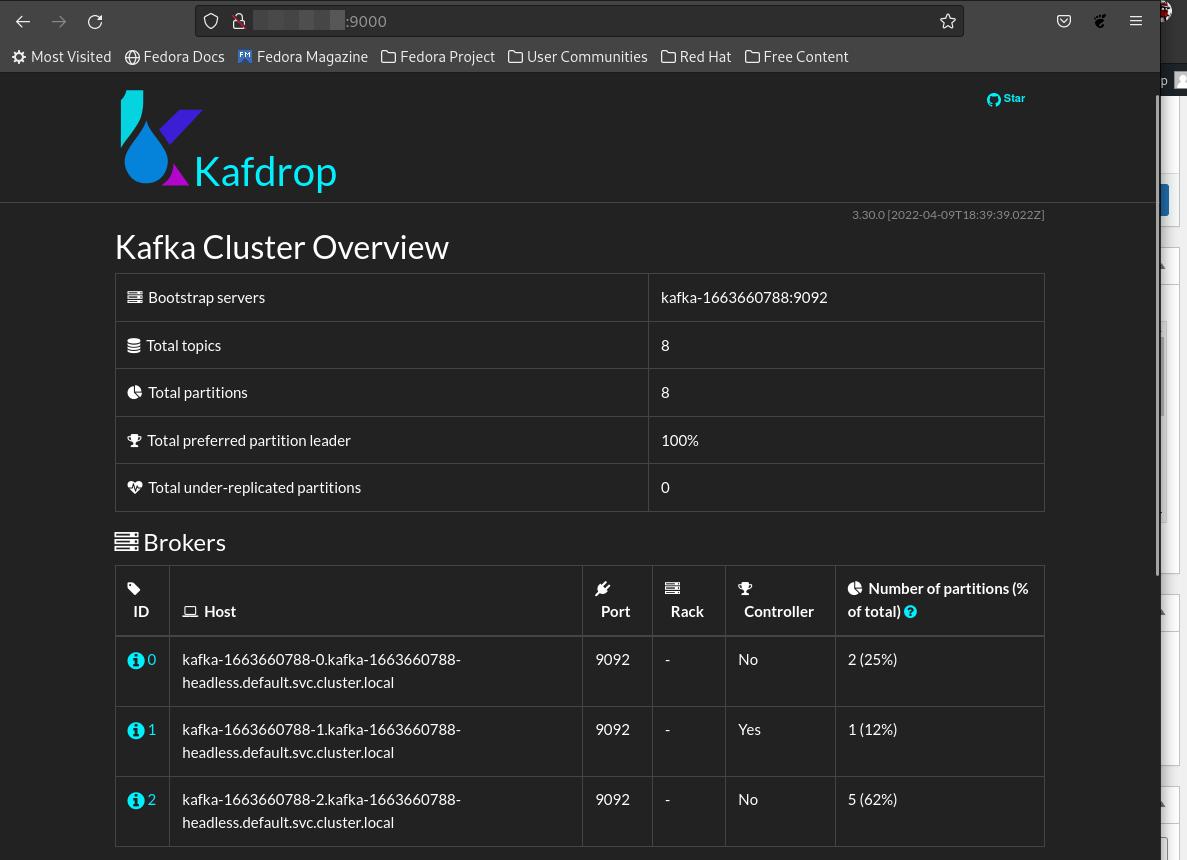
--set topic.autoCreate=trueNow let’s deploy kafdrop – Kafdrop is a UI for monitoring Apache Kafka clusters.
apiVersion: apps/v1
kind: Deployment
metadata:
  name: kafdrop
  labels:
    app: kafdrop
spec:
  replicas: 1
  selector:
    matchLabels:
      app: kafka
  template:
    metadata:
      labels:
        app: kafka
    spec:
      containers:
      - name: kafdrop
        image: obsidiandynamics/kafdrop:latest
        ports:
        - containerPort: 9000
        env:
        - name: KAFKA_BROKERCONNECT
          value: "kafka:9092"

---
apiVersion: v1
kind: Service
metadata:
  name: kafdrop
  labels:
    name: kafdrop
spec:
  ports:
  - port: 9000
    targetPort: 9000
    name: kafdrop
    protocol: TCP
  selector:
    app: kafka
type: LoadBalancerDeploy kafdrop with :
kubectl apply -f kafdrop.yamlNow you can access kafdrop in your browser with http://localhost:9000