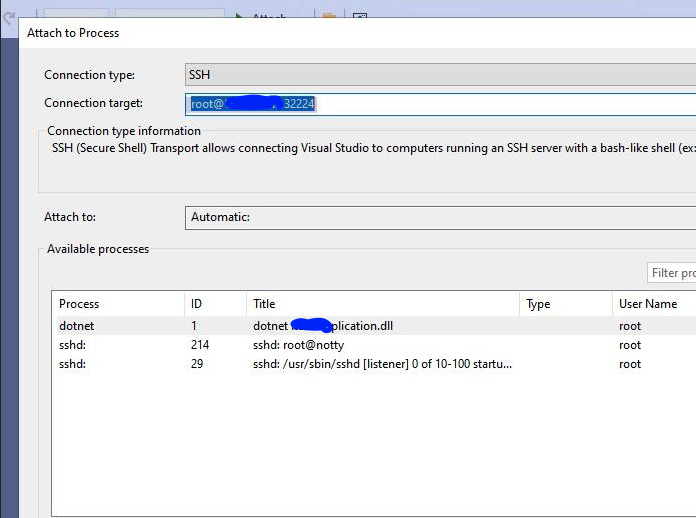
Debugging applications running in Kubernetes can be challenging, but enabling SSH access to your containers can significantly simplify the process. This guide walks you through setting up SSH access for a Kubernetes deployment using a ConfigMap to manage SSH configurations. We’ll also cover how to configure a Dockerfile to enable remote debugging in Visual Studio or via SSH.
Prerequisites
Before we begin, ensure you have the following:
- A Kubernetes cluster up and running.
kubectlconfigured to interact with your cluster.- Basic understanding of Kubernetes resources like Deployments, Services, and ConfigMaps.
1. Creating the SSH ConfigMap
First, create a ConfigMap to store the SSH server configuration (sshd_config) and the authorized keys (authorized_keys). These files will be mounted into the container to configure the SSH server.
Create a file named ssh-configmap.yaml:
apiVersion: v1
kind: ConfigMap
metadata:
  name: ssh-config
data:
  sshd_config: |
    PasswordAuthentication no
    ChallengeResponseAuthentication no
    PermitRootLogin yes
    UsePAM no
    AllowTcpForwarding yes
    PubkeyAuthentication yes
    Subsystem sftp /usr/lib/sftp-server
    PubkeyAcceptedAlgorithms=+ssh-rsa
  authorized_keys: |
    # Replace with your actual public key
    ssh-rsa AAAAB3NzaC1yc2EAAAADAQABAAABAQCy...
Apply the ConfigMap to your cluster:
kubectl apply -f ssh-configmap.yaml2. Creating the Deployment and Service
Next, create the Deployment and Service YAML file to define your application and expose the SSH and HTTP ports.
Create a file named deployment.yaml:
apiVersion: apps/v1
kind: Deployment
metadata:
  name: app
  labels:
    app: app
spec:
  replicas: 1
  selector:
    matchLabels:
      app: app
  template:
    metadata:
      labels:
        app: app
    spec:
      containers:
      - name: app
        image: image_name:latest
        imagePullPolicy: IfNotPresent
        ports:
        - containerPort: 80
        - containerPort: 22
        lifecycle:
          postStart:
            exec:
              command: ["/bin/sh", "-c", "service ssh start"]
        volumeMounts:
          - name: ssh-volume
            subPath: sshd_config
            mountPath: /etc/ssh/sshd_config
          - name: ssh-volume
            subPath: authorized_keys
            mountPath: /root/.ssh/authorized_keys
      volumes:
      - name: ssh-volume
        configMap:
          name: ssh-config
---
apiVersion: v1
kind: Service
metadata:
  name: app
spec:
  selector:
    app: app
  ports:
    - name: http
      protocol: TCP
      port: 80
      targetPort: 80
    - name: ssh
      protocol: TCP
      port: 22
      targetPort: 22
      nodePort: 32224
  type: NodePort
In the Deployment YAML, we have defined volumeMounts and volumes to manage the SSH configuration files. Here’s a breakdown of these sections:
- Volumes: This section defines a volume named
ssh-volumewhich sources its data from the ConfigMap namedssh-config. This volume provides the configuration data that will be mounted into the container.
  volumes:
    - name: ssh-volume
      configMap:
name: ssh-config- VolumeMounts: This section specifies where the volume should be mounted within the container. Two subpaths are used to mount specific files from the ConfigMap to their respective locations in the container:
subPath: sshd_configis mounted to/etc/ssh/sshd_config, configuring the SSH daemon.subPath: authorized_keysis mounted to/root/.ssh/authorized_keys, providing the public keys for SSH access.
  volumeMounts:
    - name: ssh-volume
      subPath: sshd_config
      mountPath: /etc/ssh/sshd_config
    - name: ssh-volume
      subPath: authorized_keys
      mountPath: /root/.ssh/authorized_keys
By using volumeMounts and volumes, we ensure that the necessary SSH configuration and keys are available to the container, allowing SSH access to be properly configured and started when the container launches.
Apply the Deployment and Service to your cluster:
kubectl apply -f deployment.yaml3. Configuring the Dockerfile
The Dockerfile should include steps to install and configure the SSH server. It should also set up the environment for remote debugging with Visual Studio.
Create a file named Dockerfile:
FROM mcr.microsoft.com/dotnet/sdk:8.0
WORKDIR /app
ADD . /app/

RUN apt-get update \
    && apt-get install -y --no-install-recommends openssh-server \
    && mkdir -p ~/.vs-debugger \
    && wget -O ~/.vs-debugger/GetVsDbg.sh https://aka.ms/getvsdbgsh \
    && chmod +x ~/.vs-debugger/GetVsDbg.sh \
    && dotnet publish -c release -r linux-x64 --force -o ./published

WORKDIR /app/published/
ENTRYPOINT ["dotnet", "app.dll"]
In addition to setting up SSH for debugging in Kubernetes, it’s essential to install the .vs-debugger tool to enable remote debugging capabilities, especially when using Visual Studio. This tool allows developers to connect their IDE to the containerized application running in the Kubernetes cluster, facilitating efficient debugging and code analysis.
Build and push the Docker image to your container registry:
docker build -t your-registry/image_name:latest .
docker push your-registry/image_name:latest
4. Accessing Your Container via SSH
Once the Deployment is running, you can access your container via SSH. First, find the Node IP and NodePort:
kubectl get servicesLook for the app service and note the NodePort and the IP of the node where the pod is running.
Connect to the container using SSH:
ssh -p <NodePort> root@<NodeIP>Replace <NodePort> and <NodeIP> with the actual values from your kubectl get services output.

By following these steps, you can enable SSH access to your Kubernetes containers for debugging purposes. This setup is particularly useful for troubleshooting and remote debugging with tools like Visual Studio. Always remember to secure your SSH access properly and limit it to trusted IPs and users to avoid potential security risks.
