In a DNS setup, having a slave server ensures redundancy, load balancing, and high availability. This guide will walk you through setting up a slave DNS server and syncing DNS zones from the master server.
Prerequisites
- A master DNS server running on CentOS Stream 9 with the configured
namedservice. - A slave DNS server running on CentOS Stream 9 or Debian with the
bind9service. - Root access to both servers.
- SSH connection between the master and slave servers (non-default port in use for added security).
Step 1: Prepare Your Environment
- Ensure DNS services (
namedorbind9) are installed on both servers:
# CentOS
sudo dnf install bind bind-utils

# Debian
sudo apt-get install bind9 bind9utils
Ensure Rsync service installed on both servers:
# CentOS
sudo dnf install rsync

# Debian
sudo apt-get install rsync
Update the /etc/bind/named.conf.options file on the slave DNS server, follow these steps:
- Open the configuration file for editing:
sudo nano /etc/bind/named.conf.options- Replace or add the following configuration under the
optionsblock:
   options {
       forwarders {
           8.8.8.8;
           8.8.4.4;
       };

       dnssec-validation auto;
       masterfile-format text;
       allow-query     { any; };
       allow-notify    { <slave-ip-address>; <master-ip-address>; };
       allow-query-cache { none; };
       recursion no;
       listen-on port 53 { any; };
};- Save and close the file
- Restart the BIND service to apply the changes:
sudo systemctl restart bind9- Verify the configuration to ensure there are no syntax errors:
sudo named-checkconf- Configure your firewall to allow SSH and DNS traffic:
# Example for SSH and DNS
sudo firewall-cmd --permanent --add-port=2222/tcp
sudo firewall-cmd --permanent --add-service=dns
sudo firewall-cmd --reload- Set up SSH keys for passwordless login between the servers:
run this from master server
ssh-keygen
ssh-copy-id -p 2222 root@<slave-ip-address>
Step 2: Create and Sync Zone Files
Here’s the full script code for setting up and syncing a DNS slave server:
#!/bin/bash

# Define variables
MASTER_DIR="/var/named"
SLAVE_DIR="/var/cache/bind"
SLAVE_IP="<slave-ip-address>"
MASTER_IP="<master-ip-address>"
SSH_PORT="2222"
SSH_USER="root"
ZONE_FILES="*.db"
BIND_CONFIG="/etc/bind/named.conf.local"
BIND_SERVICE="bind9"

# Sync zone files to the slave server
echo "Transferring zone files from $MASTER_DIR to $SLAVE_IP:$SLAVE_DIR..."
rsync -avz -e "ssh -p $SSH_PORT" $MASTER_DIR/$ZONE_FILES $SSH_USER@$SLAVE_IP:$SLAVE_DIR/

if [ $? -ne 0 ]; then
    echo "Error: Failed to transfer zone files to the slave server."
    exit 1
fi

# Set correct ownership for zone files
echo "Setting ownership of zone files to bind:bind..."
ssh -p $SSH_PORT $SSH_USER@$SLAVE_IP "chown bind:bind $SLAVE_DIR/*.db"

if [ $? -ne 0 ]; then
    echo "Error: Failed to set ownership for zone files."
    exit 1
fi

# Configure zones in named.conf.local on the slave server
echo "Configuring zones in $BIND_CONFIG on the slave server..."
ssh -p $SSH_PORT $SSH_USER@$SLAVE_IP bash <<EOF
ZONE_DIR="$SLAVE_DIR"
CONFIG_FILE="$BIND_CONFIG"

# Loop through each zone file in the zone directory
for ZONE_FILE in \$(ls \$ZONE_DIR/*.db 2>/dev/null); do
    ZONE_NAME=\$(basename \$ZONE_FILE .db)
    ZONE_CONFIG="zone \"\$ZONE_NAME\" IN {
    type slave;
    file \"\$ZONE_DIR/\$ZONE_NAME.db\";
    masters { $MASTER_IP; };
};"

    # Check if the zone is already configured
    if grep -q "zone \"\$ZONE_NAME\" IN" \$CONFIG_FILE; then
        echo "Zone \$ZONE_NAME already exists. Skipping..."
    else
        # Append the new zone configuration
        echo "\$ZONE_CONFIG" >> \$CONFIG_FILE
        echo "Added zone \$ZONE_NAME."
    fi
done
EOF

if [ $? -ne 0 ]; then
    echo "Error: Failed to configure zones on the slave server."
    exit 1
fi

# Restart BIND service on the slave server
echo "Reloading BIND service on the slave server..."
ssh -p $SSH_PORT $SSH_USER@$SLAVE_IP "rndc reload"


if [ $? -ne 0 ]; then
    echo "Error: Failed to restart the BIND service on the slave server."
    exit 1
fi

echo "DNS zones successfully transferred, configured, and BIND service reloaded on the slave server."
This script handles the entire process: transferring zone files, setting permissions, configuring zones in named.conf.local, and restarting the bind9 service on the slave server.
- Save the script provided earlier as
sync_dns_slave.shon the master server. - Update the variables to match your environment:
MASTER_DIR="/var/named"
SLAVE_DIR="/var/cache/bind"
SLAVE_IP="<slave-ip-address>"
MASTER_IP="<master-ip-address>"
SSH_PORT="2222"
SSH_USER="root"- Make the script executable:
chmod +x sync_dns_slave.sh- Execute the script to sync zone files and configure the slave server:
./sync_dns_slave.sh
Step 3: Verify the Configuration
- Ensure zone files are present on the slave server:
ls /var/cache/bind/*.db- Check the
named.conf.localon the slave server for added zones:
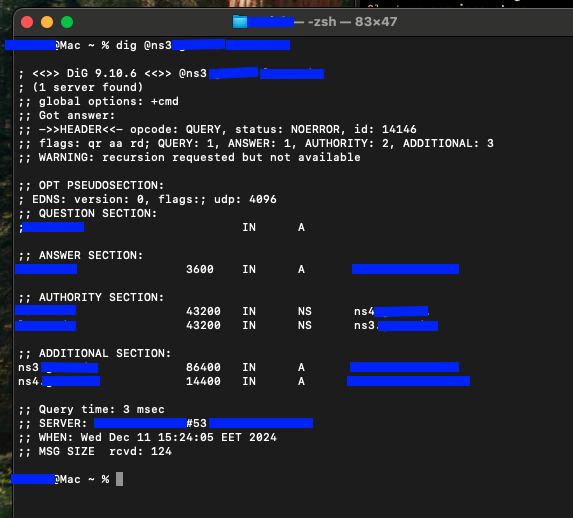
cat /etc/bind/named.conf.local- Test DNS functionality:
dig @<slave-ip-address> <zone-name>
Step 4: Automate Zone Syncing
To keep the slave server updated, set up a cron job on the master server:
crontab -eAdd the following line:
0 * * * * /path/to/sync_dns_slave.sh >> /var/log/sync_dns_slave.log 2>&1Conclusion
By following these steps, you’ve set up a resilient DNS architecture with a master-slave configuration. The provided script ensures seamless synchronization, reducing manual intervention and minimizing downtime.
