In this guide, we’ll walk through the steps to create a Kubernetes user with restricted permissions. We will also include instructions on creating a Linux user if needed. This approach ensures that the user has access only to the resources they need while maintaining the cluster’s security.
Roles vs. ClusterRoles
It’s important to understand the difference between Roles and ClusterRoles to determine the level of access required:
- Role: A Role applies only to a specific namespace and is suitable for users who need access to resources within a single namespace.
- ClusterRole: A ClusterRole is cluster-wide, granting access to resources across all namespaces or cluster-scoped resources.
Example Role:
apiVersion: rbac.authorization.k8s.io/v1
kind: Role
metadata:
  namespace: demo-namespace
  name: pod-reader
rules:
- apiGroups: [""]
  resources: ["pods"]
  verbs: ["get", "list", "watch"]
Example ClusterRole:
apiVersion: rbac.authorization.k8s.io/v1
kind: ClusterRole
metadata:
  name: pod-reader-cluster
rules:
- apiGroups: [""]
  resources: ["pods"]
  verbs: ["get", "list", "watch"]
Example RoleBinding:
apiVersion: rbac.authorization.k8s.io/v1
kind: RoleBinding
metadata:
  name: pod-reader-binding
  namespace: demo-namespace
subjects:
- kind: User
  name: example-user
  apiGroup: rbac.authorization.k8s.io
roleRef:
  kind: Role
  name: pod-reader
  apiGroup: rbac.authorization.k8s.io
Example ClusterRoleBinding:
apiVersion: rbac.authorization.k8s.io/v1
kind: ClusterRoleBinding
metadata:
  name: pod-reader-cluster-binding
subjects:
- kind: User
  name: example-user
  apiGroup: rbac.authorization.k8s.io
roleRef:
  kind: ClusterRole
  name: pod-reader-cluster
  apiGroup: rbac.authorization.k8s.io
Roles and RoleBindings are suitable for namespace-specific access, while ClusterRoles and ClusterRoleBindings are used for cluster-wide permissions.
Step 1: Define the Permissions for the User
Before creating the user, decide what resources they can access and the operations they are allowed to perform. For example:
- Read and manage access to Pods, Deployments, StatefulSets, and ReplicaSets.
- Limited access to Secrets, ConfigMaps, and Services.
- Access to networking resources such as Ingresses and Endpoints.
Role Manifest
The following example defines restricted access to specific resources
Create role.yaml and paste the following:
apiVersion: rbac.authorization.k8s.io/v1
kind: Role
metadata:
  namespace: default
  name: restricted-access
rules:

- apiGroups: [""]
  resources: ["pods", "pods/log", "pods/portforward"]
  verbs: ["get", "list", "watch", "delete"]

- apiGroups: ["apps"]
  resources: ["deployments", "statefulsets", "replicasets"]
  verbs: ["get", "list", "patch"]

- apiGroups: [""]
  resources: ["secrets", "services", "configmaps", "events", "endpoints"]
  verbs: ["get", "list", "watch"]

- apiGroups: ["networking.k8s.io"]
  resources: ["ingresses"]
  verbs: ["get", "list", "watch"]
Apply manifest:
kubectl apply -f role.yamlStep 2: Bind the Role to the User
Bind the role to the user using a RoleBinding. This associates the user with the permissions defined in the Role.
Role Binding Manifest
Create rolebinding.yaml and paste the following:
apiVersion: rbac.authorization.k8s.io/v1
kind: RoleBinding
metadata:
  name: restricted-access-binding
  namespace: default
subjects:
- kind: User
  name: example-user
  apiGroup: rbac.authorization.k8s.io
roleRef:
  kind: Role
  name: restricted-access
  apiGroup: rbac.authorization.k8s.io
Apply manifest:
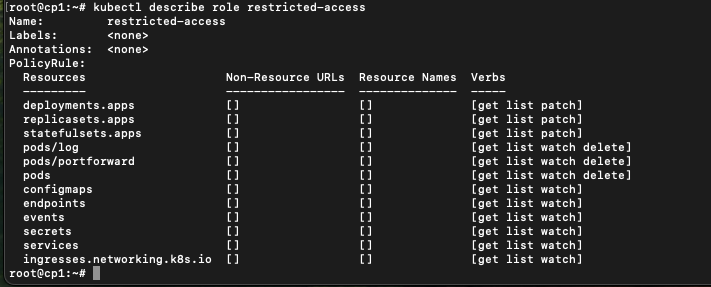
kubectl apply -f role.yamlVerify role permissions
kubectl describe role restricted-access
Step 3: Create the User in Kubernetes
Kubernetes uses certificate-based authentication to ensure secure and verifiable identity management. This method relies on X.509 certificates to establish trust between the client and the Kubernetes API server. To create a new user, generate a certificate for them.
Generate a Certificate:
- Generate a private key and CSR (Certificate Signing Request):
openssl genrsa -out user.key 2048
openssl req -new -key user.key -out user.csr -subj "/CN=example-user"- Sign the CSR with the Kubernetes CA:
openssl x509 -req -in user.csr -CA /etc/kubernetes/pki/ca.crt -CAkey /etc/kubernetes/pki/ca.key -CAcreateserial -out user.crt -days 365- Save the certificate and key for the user.
Step 4: Configure kubeconfig for the User
Create a dedicated kubeconfig file for the new user.
- Generate the kubeconfig file:
kubectl config set-credentials example-user \
     --client-certificate=user.crt \
     --client-key=user.key

kubectl config set-context example-context \
     --cluster=<cluster-name> \
     --namespace=default \
     --user=example-user

kubectl config use-context example-context

kubectl config view --minify --flatten --context=example-context > example-user-config- Share
example-user-configwith the user. - The user can place it in
~/.kube/configor use it directly:
kubectl --kubeconfig=example-user-config get podsStep 5: Create a Linux User (Optional)
This step is necessary if the Kubernetes user also requires access to the Linux server hosting the cluster. For example, this may be needed for users who need to execute commands directly on the server or manage specific resources locally. If the user’s role is restricted to interacting with Kubernetes through API or kubeconfig, this step can be skipped.
If the user needs access to the Linux server hosting Kubernetes, create a Linux user with restricted permissions.
- Add the user:
sudo adduser example-user- Set a password:
sudo passwd example-user- You can manually put
example-user-configto user’s ~/.kube folder
mkdir /home/example-user/.kube
mv example-user-config /home/example-user/.kube/config- Restrict sudo access (optional):
- Edit the sudoers file:
bash sudo visudo - Add the following line:
example-user ALL=(ALL) NOPASSWD: /bin/kubectl
Now, the Linux user can run kubectl commands (if required) without unrestricted server access.
Conclusion
By following these steps, you can create a Kubernetes user with restricted permissions tailored to their role. This ensures better security and limits the scope of access. For additional security, consider monitoring and auditing the user’s actions in the cluster.
